**60V to 12V Converter Circuit Diagram (1)**
More and more users are choosing to troubleshoot their own issues when problems arise with electric vehicle accessories. This often involves replacing components or understanding wiring setups. To help everyone better grasp the process, I’ve included detailed wiring diagrams here. When it comes to installing an electric car alarm system, the wiring principle is straightforward, but it's essential to identify the positive and negative poles of the converter correctly.
To connect a 60V lead-acid battery from a textile electric vehicle with another 60V battery in parallel, you need to ensure that the lead-acid battery and the lithium battery’s positive terminal are connected in parallel to a 50A power diode. This setup helps manage the voltage efficiently and safely.

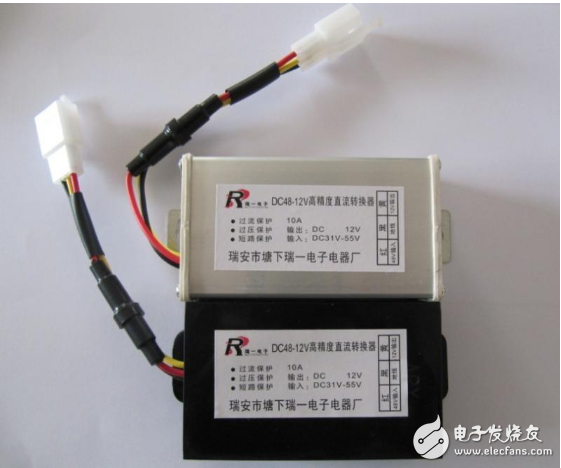
**Electric car 60v converter to 12V**
DC/DC converters, commonly referred to as power converters, are used in most battery-powered vehicles. These devices usually have some built-in current margin, but if your audio system requires higher power, it's advisable to use an additional voltage converter to avoid overloading the main unit.
The electric vehicle converter typically has three wires: red, yellow, and black. The red wire is for the input (lock line), the yellow wire provides the 12V output, and the black wire serves as the ground (negative).
**Important Notes:**
1. Ensure correct polarity when connecting the power supply. Reversing the positive and negative leads can damage the speaker or the converter.
2. Be mindful of the converter's maximum output current. For example, if the converter can only handle 1A, the full load power of the audio device should not exceed 10W to prevent overheating or failure.
**Wiring a 12V Converter on an Electric Vehicle**
This process is quite simple once you understand the basics. Most converters can step down voltages ranging from 48V to 64V to 12V. The converter will have three wires: red (high-voltage input), black (ground), and yellow (12V output). It's best to install the converter near the front of the vehicle. Connect the red wire to the electric door lock output, the black wire to the common ground, and the yellow wire to the switch of the light you want to control.
**Electric Vehicle Controller Wiring Diagram**
When replacing an electric vehicle controller, you may find a complex web of colorful wires that can be overwhelming. To simplify the process, it's important to understand what each wire does. Start by identifying the power supply’s positive and negative terminals, as well as the electric door lock line. Use a multimeter to measure the voltage and confirm which wire is which.
Next, connect the key’s power cable and the electric door lock line to the controller. The controller’s power cable is typically thick red for the positive and thick black for the negative. After connecting, turn on the key and check the voltage to make sure everything is functioning properly.
Then, connect the Hall sensor lines and the learning line. If the motor doesn’t rotate, try swapping the wires. Once the motor runs smoothly, proceed to connect the brake wires, the Hall sensor lines, and other components.
Understanding the purpose of each wire on the controller is crucial. A detailed circuit diagram can provide clarity, especially for high-end controllers.
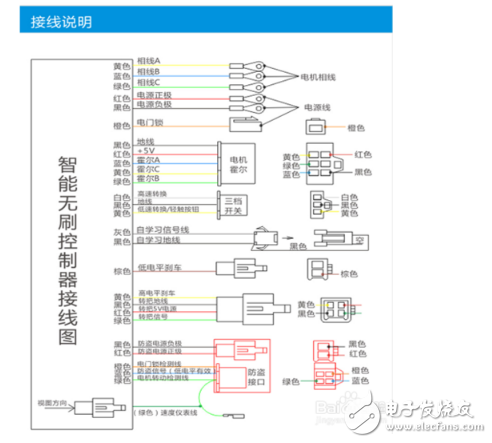
**Understanding the Lines on the Controller**
Identify the 5 Hall sensor lines, 3-phase motor lines, and 2 brake lines. The power supply terminals (+ and -) are usually easy to spot. If unsure, refer to the vehicle’s manual or look for large, clearly marked components.
If the motor isn’t working properly, the Hall sensors could be faulty. To test them, use a multimeter set to DC voltage mode. Check the signal lines while manually rotating the motor. A healthy Hall sensor will show pulse voltages between 0V and 5V.
Other important connections include the instrument line and the turn signal wires. The brake wires are typically two and act as a normally open switch. Finally, after installation, perform a test run to ensure everything works correctly. Adjust the speed control knob if needed to change the motor’s direction.
AIVONO DISPOSABLE VAPE
AIVONO
Disposable Vape is a pre-filled disposable vape pen device that is compact, a pocket-friendly size and easier to carry. The AIVONO DISPOSABLE VAPE Disposable Pen will last you longer with 600puffs/800 puffs/ 1000 puffs/1500 puffs/2500 puffs/4000 puffs/5000 puffs and is powered by Energy built-in battery and a huge pre-filled pod with tasty e-liquid.
AIVONO DISPOSABLE VAPE is a pre-filled disposable vaping device that is a pleasure to use. It has a circular light at the bottom of the pod that glows when inhaling the device. The Fume Ultra Disposable 600puffs/800 puffs/ 1000 puffs/1500 puffs/2500 puffs/4000 puffs/5000 puffs is powered by a built-in battery and pre-filled with e-liquid.
Device Details:
AIVONO PLUS 800 puffs, AIVONO BOXX 4000puffs ,AIVONO BINGO 4000puffs , AIVONO PRO 1500puffs,AIVONO Stick 2500puffs,AIVONO FIRE 1000puffs,AIVONO FISHBONE 600 PUFFS,
AIVONOÂ PLUS : cool mint
AIVONOÂ PLUS : lush ice
AIVONOÂ PLUS : cotton candy
AIVONOÂ PLUS : tangrine ice
AIVONOÂ PLUS : strawberry watermelon
AIVONOÂ PLUS : bluberry raspberry lemon
AIVONOÂ PLUS : mixed berry
AIVONOÂ PLUS : peach ice
AIVONOÂ PLUS : banana ice
AIVONOÂ PLUS : blueberry on ice
AIVONOÂ PLUS : grape ice Â
AIVONOÂ PLUS : mango ice
AIVONOÂ PLUS : strawberry ice
AIVONOÂ PLUS : apple ice
AIVONOÂ PLUS : lychee ice
AIVONOÂ PLUS : pink lemonade
AIVONOÂ PLUS : pineapple colada
AIVONOÂ PLUS : cola ice
AIVONOÂ PLUS : red rull
AIVONOÂ PLUS : melon iceÂ
Aivono Aim PRO, DISPOSABLE VAPE Cheap,Vape Pen E Cigarette,E Cigarette
Shenzhen Essenvape Technology Co., Ltd. , https://www.essenvape.com