![]()
Test - lowercase jpg
![]()
Kaixin micro test
![]()
Test probe P100-M3
![]()
Filter 18.432M
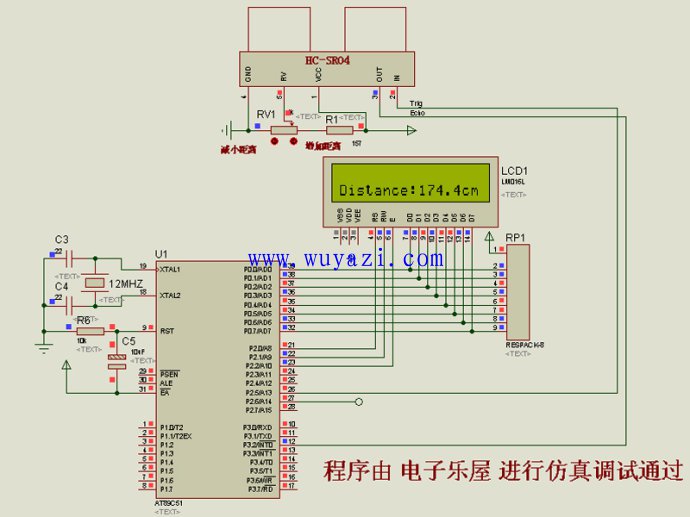
Building an ultrasonic range finder is a popular project for students and electronics enthusiasts who want to learn about microcontroller programming. This project focuses on the HC-SR04 ultrasonic sensor module, which is widely used in many DIY applications. The program is written for the 51 series microcontroller, and it uses a 1602 LCD display to show the measured distance. The system works by sending a trigger signal from the microcontroller to the sensor, which then emits an ultrasonic pulse. The time it takes for the echo to return is calculated to determine the distance.
The hardware setup is straightforward: the TRIG pin of the HC-SR04 is connected to P2.5, while the ECHO pin is connected to P3.2. A 12MHz crystal oscillator is used to ensure accurate timing. When the measured distance exceeds the sensor's range, the display shows a hyphen (-), and the unit of measurement is centimeters (cm). Due to its simple design, this project requires minimal soldering and has a high success rate when tested in simulation tools like Proteus.
The code includes functions for initializing the LCD, triggering the ultrasonic sensor, measuring the echo duration, calculating the distance, and displaying the result. It also features an interrupt service routine that manages the timer to measure the echo pulse accurately. The program is designed to be easy to understand and modify, making it ideal for learning purposes.
#include // Please note: Replace '[' with '<' and ']' with '>'
#include
#define uint unsigned int
#define uchar unsigned char
sbit rs = P2^0; // LCD data/instruction selection
sbit rw = P2^1; // LCD read/write control
sbit en = P2^2; // LCD enable control
sbit trig = P2^5; // Ultrasonic sensor TRIG
sbit echo = P3^2; // Ultrasonic sensor ECHO
bit flag1; // Trigger signal flag
uchar count; // Timer interrupt counter
long int distance; // Measured distance
unsigned char code table[] = {"0123456789"}; // LCD character array
void delay(uint n) {
uint x, y;
for(x = n; x > 0; x--)
for(y = 110; y > 0; y--);
}
void delayt(uint x) {
uchar j;
while(x--) {
for(j = 0; j < 255; j++);
}
}
void lcd_wcom(uchar com) {
rs = 0; // Select instruction register
rw = 0; // Write mode
P0 = com; // Send command to P0
delay(5); // Delay for LCD to prepare
en = 1; // Enable signal
en = 0;
}
void lcd_wdat(uchar dat) {
rs = 1; // Select data register
rw = 0; // Write mode
P0 = dat; // Send data to P0
delay(5); // Delay for LCD to prepare
en = 1; // Enable signal
en = 0;
}
void lcd_init() {
lcd_wcom(0x38); // 8-bit data, 2 lines, 5x7 font
lcd_wcom(0x0c); // Display on, cursor off, blink off
lcd_wcom(0x06); // Auto increment address
lcd_wcom(0x01); // Clear screen
}
void lcd_xianshi() {
lcd_wcom(0x80 + 0x40);
lcd_wdat('D');
lcd_wdat('i');
lcd_wdat('s');
lcd_wdat('t');
lcd_wdat('a');
lcd_wdat('n');
lcd_wdat('c');
lcd_wdat('e');
lcd_wdat(':');
lcd_wcom(0x80 + 0x4c);
lcd_wdat('.');
lcd_wcom(0x80 + 0x4e);
lcd_wdat('c');
lcd_wdat('m');
}
void init_t0() {
TMOD = 0x01; // Timer 0 in mode 1
TL0 = 0x66;
TH0 = 0xfc; // 1ms
ET0 = 1; // Enable timer 0 interrupt
EA = 1; // Global interrupt enable
}
void trigger() {
trig = 0;
_nop_(); _nop_(); _nop_(); _nop_(); _nop_();
_nop_(); _nop_(); _nop_(); _nop_(); _nop_();
_nop_(); _nop_(); _nop_(); _nop_(); _nop_();
_nop_(); _nop_(); _nop_(); _nop_(); _nop_();
trig = 1;
}
void init_measuring() {
trig = 1;
echo = 1;
count = 0;
}
void measuring() {
uchar l;
uint h, y;
TR0 = 1;
while(echo == 1) { ; }
TR0 = 0;
l = TL0;
h = TH0;
y = (h << 8) | l;
y = y - 0xfc66; // Adjust for initial timer value
distance = y + 1000 * count;
TL0 = 0x66;
TH0 = 0xfc;
delayt(30);
distance = 3453 * distance / 20000; // Calculate distance in cm
}
void display(uint x) {
uchar qian, bai, shi, ge;
qian = x / 1000;
bai = x / 100;
shi = x / 10;
ge = x % 10;
lcd_wcom(0x80 + 0x49);
lcd_wdat(table[qian]);
lcd_wdat(table[bai]);
lcd_wdat(table[shi]);
lcd_wcom(0x80 + 0x4d);
lcd_wdat(table[ge]);
}
void main() {
lcd_init();
init_t0();
init_measuring();
while(1) {
lcd_xianshi();
trigger();
while(echo == 0) { ; }
measuring();
display(distance);
init_measuring();
delayt(600);
}
}
// Interrupt service routine for Timer 0
void T0_isr() interrupt 1 {
TF0 = 0;
TL0 = 0x66;
TH0 = 0xfc;
count++;
if(count == 18) {
TR0 = 0;
TL0 = 0x66;
TH0 = 0xfc;
count = 0;
}
}
Solar Water Pump
PV pumping system is the use of solar modules to solar energy directly into electrical energy, drive motor driven pump device. Mainly divided into submersible pumps photovoltaic pumping and ground pumping photovoltaic pumping (suction stroke, different installation methods); PV pumping system: no fuel consumption, no power grid, almost no need for operation and maintenance, long service life, low average cost, especially for water and electricity shortage areas. Do not need batteries, solar modules directly driven by the pump work.
Solar Pump System,Solar Water Management System, Water Transfer Pump,Pumping Stations,DC Pump
Wuxi Sunket New Energy Technology Co.,Ltd , https://www.sunketsolar.com