Nowadays TV cards are equipped with a matching remote control and integrated receiver on the card, which can realize remote control and some other TV/computer operations. However, is it true that a friend without a TV card has no remote control?
This article refers to the address: http://
Computer remote control receiver circuit and production
In fact, it is very easy to make a computer remote control receiver. First of all, the computer remote control we made must use the infrared method (not the remote control of the radio frequency). The remote control of the general TV and DVD player can be used. If there is no idle remote control at hand, you can buy it in the small commodity market. The TV remote control can be sold at a price of more than ten yuan. Be careful not to use the air conditioner's remote control, although it is also infrared, but every time you press a button, it will send all the current state of the air conditioner (mode, temperature, wind speed, wind direction), resulting in a long code string sent each time. Will cause software identification errors.
After comparison, we chose Girder (v3.3.7), a remote control software that is fully functional and supports plug-ins to support new remote receivers and new operations. It can be said that it is "only unexpected, no." To ". In addition to daily operations, if you use the remote control during the slide show, you can liberate the speaker from the side of the computer, so that you can interact with the audience more flexibly and intimately to achieve better display results.
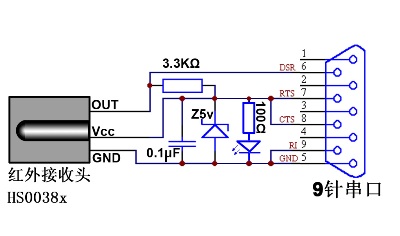
Figure 1 computer remote receiver circuit
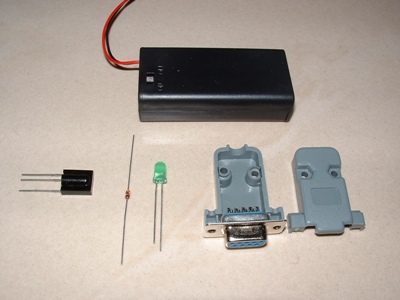
The circuit solution for our remote receiver is taken from Girder's third-party plug-in: "SFH-56 plugin for Girder". The circuit diagram (Figure 1) is as simple as six components, and the LED (power indicator) and 100Ω protection resistor can be removed directly to further simplify the circuit. The main components are HS0038A infrared remote control receiver, 5V voltage regulator tube (1/4W), LED, 9-pin serial port plug, resistor (3.3KΩ and 100Ω each), electrolytic capacitor (0.1μF, 10V or more), universal printed circuit The board, the wire (at least 3 cores) and the battery case (acting as the outer casing) are not more than 10 yuan in total.
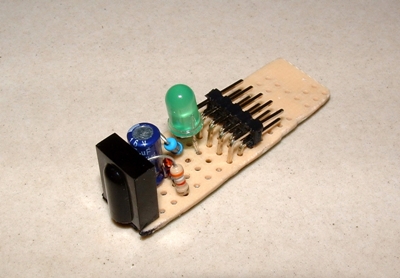
As long as there is the ability to solder a simple circuit, according to the circuit diagram, the circuit can be completed very quickly.
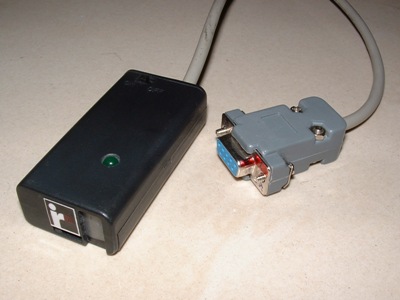
Then install the board into the battery box with the contact copper removed, and open the hole in the corresponding position of the battery box. Because the whole circuit is very light, you can put a powerless one on the empty side of the battery box. Battery (although there is no electricity, but it is still necessary to prevent the battery from being short-circuited, otherwise the battery leakage will cause a short circuit, which may damage the motherboard through the serial port), and the hardware production is completed.
Test remote control
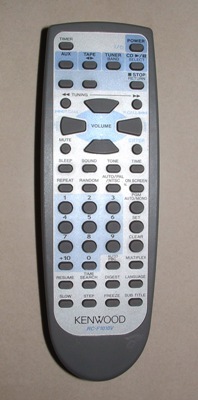
After testing, the receiver's effective receiving range is about 7 meters, and the sensitivity is very high. The experiment found that the remote control of the original step by step DVD must be effective for the operation of the DVD player, and when used with the self-made receiver, non-directional operation can be realized (that is, the receiver can receive infrared signals that are reflected multiple times through the wall), It is convenient for our use and makes the placement of the receiver more flexible. Finally, considering the factors such as the number of buttons, button layout, feel, size, etc., I chose the remote control of the idle Kenwood desktop audio (49 keys).
Software settings
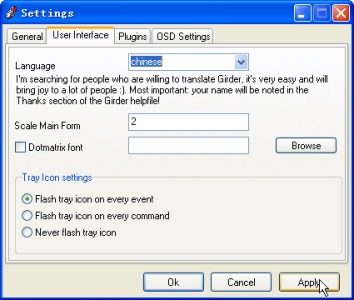
The following software setup work is the most important. First, copy the "SFH-56 plugin for Girder" plugin (file name "igor SFH-56P lug.dll") to the plugins folder in the Girder installation directory, and then enter Girder, first click Settings in the File menu, change the Language to Chinese in the User interface tab of the Settings window, click the "Apply" button.
Select "Igor SFH-56 device" in the "Plugins" tab, after confirming,
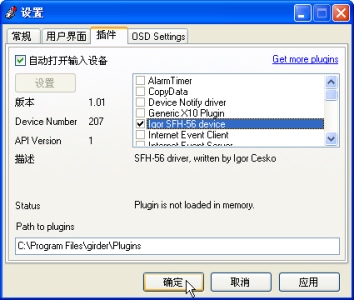
Go to this location again, click the "Settings" button in the "Plugins" tab, and pop up an Igor Config window, which selects the COM1 or COM2 port according to the actual situation.
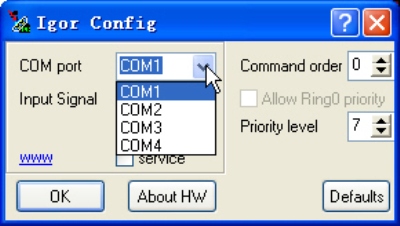
Click "OK" to exit, and the setup work is completed.
Next, we can add commands according to our own needs. Here, we choose some representative commands for your reference, and the rest can be bypassed.
Common operation: Right click on the command area on the left side of the Girder window, select Add command; select the action to be performed, click the "learn event" button at the top right, and then press the button on the remote control where you want to define the function. The received infrared command code will appear in the dark red strip area.

Such as "1D807A85", and the same operation can be learned multiple times to support multiple remote controllers; finally, fill in 200 in the "anti-key repeat waiting time" column, so that within 200 milliseconds after a key command occurs, ignore the same Key events to prevent repeated actions.
function test
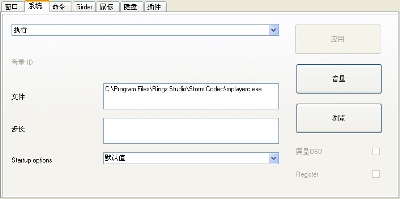
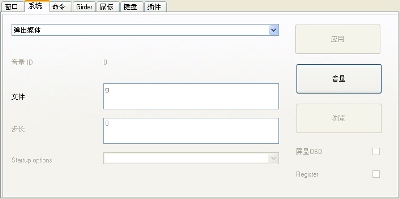
1. Run the program. Take Media Player Classic as an example. Click the "System" tab in the right operation area, select "Execute" in the drop-down menu, click the "Browse" button, and select "mplayerc." in our corresponding directory in the pop-up open file window. Exe", and finally click on the "Apply" button.
2. Simulate keyboard keys. The first few steps are the same as above, just click on the "Keyboard" tab on the right, enter the button to be simulated in the "Sentence" text box, and decide whether to select Ctrl, Shift and Alt as needed. If you want to define a button that cannot be played, you can Make a selection in the "Special Keys" drop-down menu, paying particular attention to the Enter key being "RETURN" instead of "Enter". With the hotkey function of the playback software, the function of playing/pausing/next/fast forward/full screen of the video/audio file can be realized by button simulation.
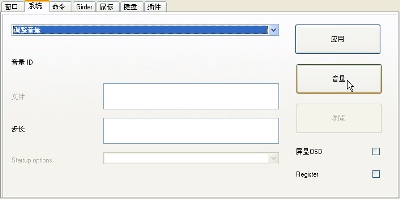
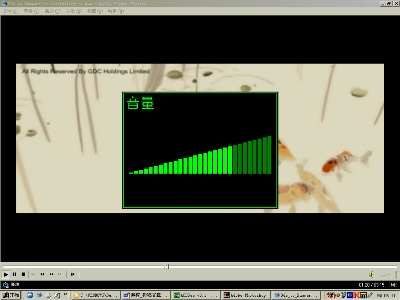
3. Change the volume. Open the drop-down menu in the "System" tab, select "Adjust Volume" and click the "Volume" button on the right.
Select "master volume" and click the OK button
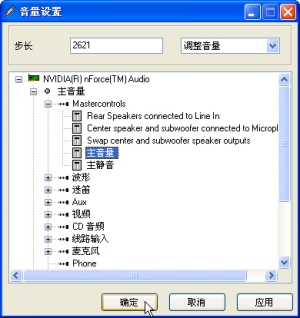
"Step size" fill in "2621" (2621 means increase the volume of one grid, -2621 means lower the volume of one grid), and check "Screen display OSD"

(Figure 14)
A similarly useful mute function can be achieved in a similar manner.
4. The optical drive tray is ejected/closed. This is a set of reciprocal operations. If the two buttons on the remote control are naturally simple, but you need to remember more than one button definition, and you need to occupy more buttons, it is better to set them on the same button. More than one button is available to define other actions. The same button should be defined as two operations that are executed in turn. There are also some differences in the settings. First, add "add command group" instead of "add command" when adding, and then add another command in the command group for easy identification. Renamed the name "pop-up" (no effect on the function), then select "eject media" in the "System" tab, and fill in the drive letter of the CD-ROM in the "File" text box (write only letters, not Colon), click on the command
(Figure 15)
Press "F6" to pop up an "Adjust Command Response Order" window, change "Maximum Status Value" to "2" and "Initial Status Value" to "1".
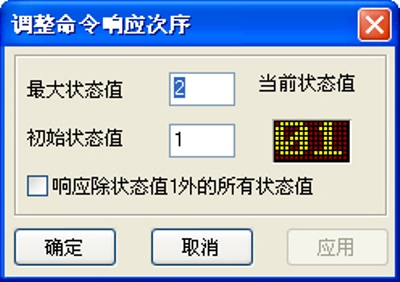
(Figure 16)
In addition, add a command in the command group, name it "Screen Display - Popup", click the "Girder" tab, select "Simple OSD", and write "CD-ROM Pop-up" in the "Icon/Device" text box below. a type of prompt
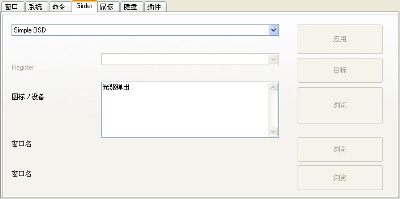
The "maximum state value" and "initial state value" are also set to "2" and "1", respectively. Because the commands in the same command group are executed sequentially, drag the "Screen Display - Popup" command to the "Eject" command before dragging it to display the prompt first, and then eject the tray. Similarly, create a command to close the CD-ROM, but change the "eject media" to "load media" and change the "maximum state value" and "initial state value" to "2" and "2" respectively. The prompt of the CD-ROM is turned off, and the "maximum state value" and "initial state value" are also "2" and "2". Finally, select the command group, click "learning command", and define the operation on the remote control button. Note that the "anti-key repeat waiting time" should be set to 1000 milliseconds or more, otherwise the pop-up and close commands will be executed continuously. Completed. Thus, when the defined CD-ROM pop-up/close button is pressed, the status value cycles between 1 and 2 and a status prompt message is displayed on the screen.
5. Mouse operation. Select the desired function from the items in the "Mouse" tab drop-down menu, and make settings, including mouse movement, click, double click, and scroll wheel. Items for the Move/Scroll class should be set in the text box below. The step value of the move (in pixels).
to sum up
In short, the operations supported by Girder are very diverse, coupled with the support of the plug-in, not only can respond to the operation of the remote control, but even support the gamepad and keyboard. Many of the more useful and fun features have yet to be discovered and created.
We make OBD connector with terminal by ourselves, soldering type and crimping type are both available. Such as 16pin obd connector. OBD1, OB2, J1939, J1708, J1962, etc. Also molded by different type, straight type or right-angle type. The OBD connector cables used for Audi, Honda, Toyota, BWM, etc. We have wide range of materials source , also we can support customers to make a customized one to replace the original ones.
Automotive Diagnostic Connectors And Cables
Automotive Diagnostic Connectors And Cables,Obd Connectors,Reliable OBD Connector,Black OBD Connector,OBD Diagnostic Cable,OBD2 Connectors
ETOP WIREHARNESS LIMITED , https://www.etopwireharness.com